The gui module is an optional module when you compile the slope interpreter. With the module installed the following will produce a window with the text "Hello, world!" and the title of the window will be "Hello".
DEFINE PTR="CARD"

BYTE FUNC AtasciiToInternal(CHAR c)
  BYTE c2

  c2=c&$7F
  IF c2<32 THEN
    RETURN (c+64)
  ELSEIF c2<96 THEN
    RETURN (c-32)
  FI
RETURN (c)

PROC CharOut(CARD x BYTE y CHAR c)
  BYTE i,j,v
  PTR addr

  addr=$E000+AtasciiToInternal(c)*8;
  FOR j=0 TO 7
  DO
    v=Peek(addr)
    i=8
    WHILE i>0
    DO
      IF (v&1)=0 THEN
        Color=0
      ELSE
        Color=1
      FI
      Plot(x+i-1,y+j)

      v=v RSH 1
      i==-1
    OD
    addr==+1
  OD
RETURN

PROC TextOut(CARD x BYTE y CHAR ARRAY text)
  BYTE i

  FOR i=1 TO text(0)
  DO
    CharOut(x,y,text(i))
    x==+8
  OD
RETURN

PROC Frame(CARD x BYTE y,width,height)
  Color=1
  Plot(x,y)
  DrawTo(x+width-1,y)
  DrawTo(x+width-1,y+height-1)
  DrawTo(x,y+height-1)
  DrawTo(x,y)
RETURN

PROC Main()
  BYTE CH=$02FC,COLOR1=$02C5,COLOR2=$02C6
  BYTE i,x,y,width=[122],height=[10]

  Graphics(8+16)
  COLOR1=$0C
  COLOR2=$02

  FOR i=1 TO 10
  DO
    x=Rand(320-width)
    y=Rand(192-height)
    Frame(x,y,width,height)
    TextOut(x+1,y+1,"Goodbye, World!")
  OD

  DO UNTIL CH#$FF OD
  CH=$FF
RETURN
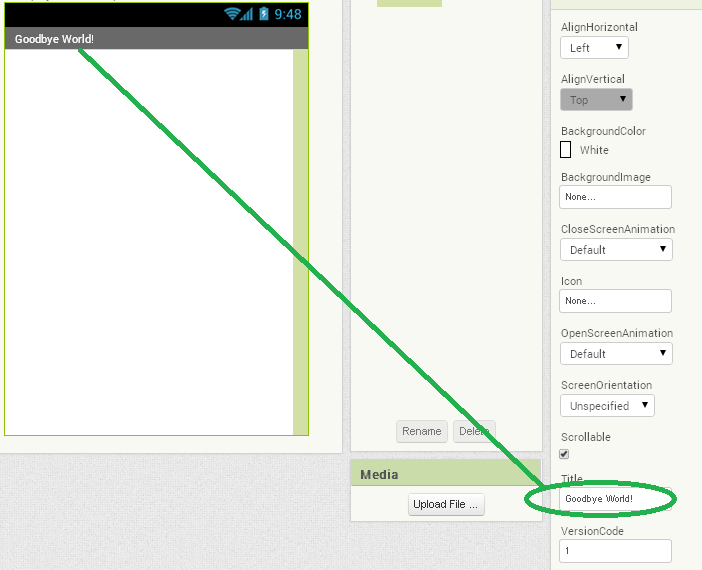
This solution requires no code blocks as the text is entered directly into the Title properties TextBox of the Designer. VIEW THE DESIGNER
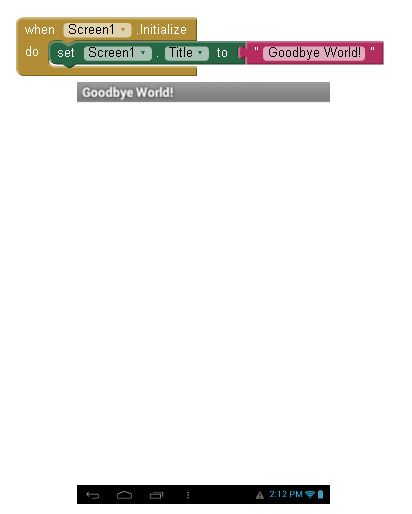
Three blocks solution
This solution uses three blocks to assign the text to the Title bar:
Screen1.Initialize and
set Screen1.Title to "Goodbye World!" VIEW THE BLOCKS AND ANDROID APP SCREEN
  1 LET T$ = "GOODBYE, WORLD!"
  2 LET R = 5:GX = 3:GY = 2:O = 3:XC = R + GX:YC = R * 2 + GY
  3 TEXT : HOME : TEXT : HGR : HCOLOR= 7: HPLOT 0,0: CALL 62454: HCOLOR= 6
  4 LET L =  LEN (T$): FOR I = 1 TO L:K =  ASC ( MID$ (T$,I,1)):XO = XC:YO = YC: GOSUB 5:XC = XO + 1:YC = YO: GOSUB 7: NEXT : END
  5 IF K > 64 THEN K = K + LC: GOSUB 20:LC = 32: RETURN
  6 LET LC = 0: ON K >  = 32 GOTO 20: RETURN
  7 GOSUB 20:XC = XC + R * 2 + GX: IF XC > 279 - R THEN XC = R + GX:YC = YC + GY + R * 5
  8 RETURN
  9 LET XC = XC - R * 2: RETURN
 10 LET Y = R:D = 1 - R:X = 0
 11 IF D >  = 0 THEN Y = Y - 1:D = D - Y * 2
 12 LET D = D + X * 2 + 3
 13 IF O = 1 OR O = 3 THEN  GOSUB 17
 14 IF O = 2 OR O = 3 THEN  GOSUB 19
 15 LET X = X + 1: IF X < Y THEN 11
 16 LET O = 3:E = 0: RETURN
 17 HPLOT XC - X,YC + Y: HPLOT XC + X,YC + Y: HPLOT XC - Y,YC + X: IF  NOT E THEN  HPLOT XC + Y,YC + X
 18 RETURN
 19 HPLOT XC - X,YC - Y: HPLOT XC + X,YC - Y: HPLOT XC - Y,YC - X: HPLOT XC + Y,YC - X: RETURN
 20 LET M = K - 31
 21 ON M GOTO 32,33,34,35,36,37,38,39,40,41,42,43,44
 22 LET M = M - 32
 23 ON M GOTO 64,65,66,67,68,69,70,71,72,73,74,75,76,77,78,79,80,81,82,83,84,85,86,87
 24 LET M = M - 32
 25 ON M GOTO 96,97,98,99,100,101,102,103,104,105,106,107,108,109,110,10,112,113,114,115,116,117,118,119,120,121
 32 RETURN
 33 HPLOT XC - R,YC - R * 2 TO XC - R,YC + R - GY: HPLOT XC - R,YC + R: GOTO 9: REM !
 44 HPLOT XC - R,YC + R + R / 2 TO XC - R,YC + R: GOTO 9: REM ,
 71 LET O = 2:YC = YC - R: GOSUB 10:YC = YC + R: HPLOT XC - R,YC TO XC - R,YC - R: HPLOT XC + R / 2,YC TO XC + R,YC TO XC + R,YC + R:O = 1: GOTO 10: REM G
 87 HPLOT XC - R,YC - R * 2 TO XC - R,YC + R TO XC,YC TO XC + R,YC + R TO XC + R,YC - R * 2: RETURN : REM W
 98 HPLOT XC - R,YC - R * 2 TO XC - R,YC + R: GOTO 10: RETURN : REM B
100 HPLOT XC + R,YC - R * 2 TO XC + R,YC + R: GOTO 10: REM D
101 HPLOT XC - R,YC TO XC + R,YC:E = 1: GOTO 10: REM E
108 HPLOT XC - R,YC - R * 2 TO XC - R,YC + R: GOTO 9: REM L
114 HPLOT XC - R,YC - R TO XC - R,YC + R:O = 2: GOTO 10: REM R
121 HPLOT XC - R,YC - R TO XC,YC + R: HPLOT XC + R,YC - R TO XC - R,YC + R * 3: RETURN : REM Y
#include<GUIConstantsEx.au3>$hGUI=GUICreate("Hello World"); Create the main GUIGUICtrlCreateLabel("Goodbye, World!",-1,-1); Create a label dispalying "Goodbye, World!"GUISetState(); Make the GUI visibleWhile1; Infinite GUI loop$nMsg=GUIGetMsg(); Get any messages from the GUISwitch$nMsg; Switch for a certain eventCase$GUI_EVENT_CLOSE; When an user closes the windowsExit; ExitEndSwitchWEnd
' Demonstrate a simple Windows application using FreeBasic

#include once "windows.bi"

Declare Function WinMain(ByVal hInst As HINSTANCE, _
      ByVal hPrev As HINSTANCE, _
      ByVal szCmdLine as String, _
      ByVal iCmdShow As Integer) As Integer
End WinMain( GetModuleHandle( null ), null, Command( ), SW_NORMAL )

Function WinMain (ByVal hInst As HINSTANCE, _
                  ByVal hPrev As HINSTANCE, _
                  ByVal szCmdLine As String, _
                  ByVal iCmdShow As Integer) As Integer
    MessageBox(NULL, "Goodbye World", "Goodbye World", MB_ICONINFORMATION)
    function = 0
End Function
' Demonstrate a simple Windows/Linux application using GTK/FreeBasic

#INCLUDE "gtk/gtk.bi"

gtk_init(@__FB_ARGC__, @__FB_ARGV__)

VAR win = gtk_window_new (GTK_WINDOW_TOPLEVEL)
gtk_window_set_title (gtk_window (win), "Goodbye, World")
g_signal_connect(G_OBJECT (win), "delete-event", @gtk_main_quit, 0)
gtk_widget_show_all (win)

gtk_main()

END 0
From Window 7 and later, pure Batch File does not completely provide GUI. However, MSHTA.EXE provides command-line JavaScript/VBScript access.
@echo off

::Output to message box [Does not work in Window 7 and later]
msg * "Goodbye, World!" 2>nul

::Using MSHTA.EXE Hack::
@mshta javascript:alert("Goodbye, World!");code(close());
@mshta vbscript:Execute("msgbox(""Goodbye, World!""):code close")
pause
Using the graphics library included with Turbo C. The BGI driver and the font must be in the same directory as the program (EGAVGA.BGI and SANS.CHR). Compile with tcc hellobgi.c graphics.lib.
There are no text drawing routines in BASIC that apply to the high resolution bitmap mode on the Commodore 64. Therefore, it is necessary to either draw letterforms from designs stored in RAM, or copy the font contained in ROM. It should be noted that using BASIC to handle high resolution graphics is a slow process, and the same tasks are much more efficiently accomplished in assembly language/machine code.
This example will iterate through the string and copy the appropriate bitmap information from the Character ROM. In line 425 a conversion must take place since strings are stored in memory as bytes of ASCII (PETSCII) codes, however, the Character ROM is stored in order of the screen codes as found in Appendix B of the Commodore 64 Programmer's Reference Guide... And even then the conversion given will work only for a limited set of the Character ROM. This could be remedied if the Character ROM (or some other font definition) was copied to RAM and indexed in ASCII/PETSCII order.
The POKE statements encapsulating the text drawing routine (lines 410-415 and 450-455) are necessary to make the Character ROM visible to BASIC without crashing the operating system. As such, keyboard scanning must be suspended during this time, preventing the routine from any user interruption until it is finished.
1 rem hello world on graphics screen
2 rem commodore 64 version

10 print chr$(147): print " press c to clear bitmap area,"
15 print " any other key to continue"
20 get k$:if k$="" then 20
25 if k$<>"c" then goto 40

30 poke 53280,0:print chr$(147):print " clearing bitmap area... please wait..."
35 base=8192:for i=base to base+7999:poke i,0:next

40 print chr$(147);
45 poke 53272,peek(53272) or 8:rem set bitmap memory at 8192 ($2000)
50 poke 53265,peek(53265) or 32:rem enter bitmap mode

55 rem write text to graphics at tx,ty
60 t$="goodbye, world!":tx=10:ty=10
65 gosub 400

70 rem draw sine wave - prove we are in hi-res mode
75 for x=0 to 319:y=int(50*sin(x/10))+100:gosub 500:next

80 rem wait for keypress
85 get k$:if k$="" then 85

90 rem back to text mode, restore colors, end program
95 poke 53265,peek(53265) and 223:poke 53272,peek(53272) and 247
100 poke 53280,14:poke 53281,6:poke 646,14
200 end

400 rem write text to graphics routine
405 tx=tx+(40*ty):m=base+(tx*8)
410 poke 56334,peek(56334) and 254 : rem turn off keyscan
415 poke 1,peek(1) and 251 : rem switch in chargen rom
420 for i=1 to len(t$)
425 l=asc(mid$(t$,i,1))-64:if l<0 then l=l+64
430 for b=0 to 7
435 poke m,peek(53248+(l*8)+b)
440 m=m+1
445 next b, i
450 poke 1,peek(1) or 4 : rem switch in io
455 poke 56334,peek(56334) or 1 : rem restart keyscan
460 return

500 rem plot a single pixel at x,y
510 mem=base+int(y/8)*320+int(x/8)*8+(y and 7)
520 px=7-(x and 7)
530 poke mem,peek(mem) or 2^px
540 return
(use-package:ltk)(defunshow-message(text)"Show message in a label on a Tk window"(with-ltk()(let*((label(make-instance'label:texttext))(button(make-instance'button:text"Done":command(lambda()(ltk::break-mainloop)(ltk::update)))))(packlabel:side:top:expandt:fill:both)(packbutton:side:right)(mainloop))))(show-message"Goodbye World")
This can also be done using the CLIM 2.0 specification. The following code runs on both SBCL and the LispWorks
IDE:
(in-package:clim-user)(defclasshello-world-pane(clim-stream-pane)())(define-application-framehello-world()((greeting:initform"Goodbye World":accessorgreeting))(:pane(make-pane'hello-world-pane)));;; Behaviour defined by the Handle Repaint Protocol(defmethodhandle-repaint((panehello-world-pane)region)(let((w(bounding-rectangle-widthpane))(h(bounding-rectangle-heightpane)));; Blank the pane out(draw-rectangle*pane00wh:filledt:ink(pane-backgroundpane));; Draw greeting in center of pane(draw-text*pane(greeting*application-frame*)(floorw2)(floorh2):align-x:center:align-y:center)))(run-frame-top-level(make-application-frame'hello-world:width200:height200))
DEF Win:WINDOW
DEF Close:CHAR
DEF ScreenSizeX,ScreenSizeY:INT

GETSCREENSIZE(ScreenSizeX,ScreenSizeY)

WINDOW Win,0,0,ScreenSizeX,ScreenSizeY,0,0,"Goodbye program",MainHandler

PRINT Win,"Goodbye, World!"
'Prints in the upper left corner of the window (position 0,0).

WAITUNTIL Close=1

CLOSEWINDOW Win

END

SUB MainHandler

    IF @CLASS=@IDCLOSEWINDOW THEN Close=1

RETURN
To differentiate only a GUI message use the display_ verb.
display_me()_msg(Goodbye, World!);
However, using the _msg</code (short for 'message') action will send a string message to the callee who may decide to display the string graphically...
Allows entry of any name into a text field (using "World" as the default entry). Then, when the "Say Goodbye" button is pressed, sets a text label to the value "Goodbye, <name>!".
import org.eclipse.edt.rui.widgets.*;
import dojo.widgets.*;

handler HelloWorld type RUIhandler{initialUI =[ui]}

    ui Box {columns=1, children=[nameField, helloLabel, goButton]};

    nameField DojoTextField {placeHolder = "What's your name?", text = "World"};
    helloLabel TextLabel {};
    goButton DojoButton {text = "Say Goodbye", onClick ::= onClick_goButton};

    function onClick_goButton(e Event in)
        helloLabel.text = "Goodbye, " + nameField.text + "!";
    end

end
(fn love.load[](love.window.setMode300300{"resizable"false})(love.window.setTitle"Hello world/Graphical in Fennel!"))(let [str"Goodbye, World!"](fn love.draw[](love.graphics.printstr95150)))
To run this, you need to have LÖVE installed in your machine, and then run this command fennel --compile love_test.fnl > main.lua; love .. Since LÖVE has no compatibility with Fennel, we need to AOT-compile the file to a Lua file called main.lua, so then LÖVE can execute the program.
This brings up an infinitely-rescalable graphic window containing "Goodbye, World" drawn graphically.
All Frink graphics can be written to arbitrary coordinates;  Frink will automatically scale and center any drawn graphics to be visible in the window (greatly simplifying programming,) so the exact coordinates used below are rather arbitrary.  (This means that if you wrote "Hello World" instead of "Goodbye, World", you could just change that string and everything would still center perfectly.)
The graphics are infinitely-scalable and can be rendered at full quality to any resolution.  This program "shows off" by rotating the text by 10 degrees, and also rendering it to a printer (which can include tiling across multiple pages) and rendering to a graphics file.   (Frink can automatically render the same graphics object to many image formats, including PNG, JPG, SVG, HTML5 canvas, animated GIF, bitmapped image in memory, and more.)
g = new graphics
g.font["SansSerif", 10]
g.text["Goodbye, World!", 0, 0, 10 degrees]
g.show[]

g.print[]                           // Optional: render to printer
g.write["GoodbyeWorld.png", 400, 300] // Optional: write to graphics file
importgui$include"guih.icn"classWindowApp:Dialog()# -- automatically called when the dialog is createdmethodcomponent_setup()# add 'hello world' labellabel:=Label("label=Hello world","pos=0,0")add(label)# make sure we respond to close eventconnect(self,"dispose",CLOSE_BUTTON_EVENT)endend# create and show the windowproceduremain()w:=WindowApp()w.show_modal()end
DEF Win:WINDOW
DEF Close:CHAR
DEF ScreenSizeX,ScreenSizeY:UINT

GETSCREENSIZE(ScreenSizeX,ScreenSizeY)

OPENWINDOW Win,0,0,ScreenSizeX,ScreenSizeY,NULL,NULL,"Goodbye program",&MainHandler

PRINT Win,"Goodbye, World!"
'Prints in upper left corner of the window (position 0,0).

WAITUNTIL Close=1

CLOSEWINDOW Win

END

SUB MainHandler

    IF @MESSAGE=@IDCLOSEWINDOW THEN Close=1

RETURN
ENDSUB
importjavax.swing.*;importjava.awt.*;publicclassOutputSwing{publicstaticvoidmain(String[]args){SwingUtilities.invokeLater(newRunnable(){publicvoidrun(){JOptionPane.showMessageDialog(null,"Goodbye, World!");// in alert boxJFrameframe=newJFrame("Goodbye, World!");// on title barJTextAreatext=newJTextArea("Goodbye, World!");// in editable areaJButtonbutton=newJButton("Goodbye, World!");// on buttonframe.setLayout(newFlowLayout());frame.add(button);frame.add(text);frame.pack();frame.setDefaultCloseOperation(JFrame.EXIT_ON_CLOSE);frame.setVisible(true);}});}}
In the following, which generates SVG in a way that can be readily viewed using a web browser, the "Goodbye, World!" text is shaded using a linear gradient.
The approach used here to generate SVG is based on these principles:
a JSON object is used to specify CSS styles
this makes it easy to combine default specifications with partial specifications, because in jq, for JSON objects, "+" is defined so that (default + partial) is the combination which gives precedence to the right-hand-side operand;
for other defaults, the jq "//" operator can be used; thus all SVG parameters can be easily given defaults.
Part 1: Generic SVG-related functions
# Convert a JSON object to a string suitable for use as a CSS style value
# e.g: "font-size: 40px; text-align: center;" (without the quotation marks)
def to_s:
  reduce to_entries[] as $pair (""; . + "\($pair.key): \($pair.value); ");

# Defaults: 100%, 100%
def svg(width; height):
  "<svg width='\(width // "100%")' height='\(height // "100%")'
           xmlns='http://www.w3.org/2000/svg'>";

# Defaults:
#  id: "linearGradient"
#  color1: rgb(0,0,0)
#  color2: rgb(255,255,255)
def linearGradient(id; color1; color2):
  "<defs>
    <linearGradient id='\(id//"linearGradient")' x1='0%' y1='0%' x2='100%' y2='0%'>
      <stop offset='0%' style='stop-color:\(color1//"rgb(0,0,0)");stop-opacity:1' />
      <stop offset='100%' style='stop-color:\(color2//"rgb(255,255,255)");stop-opacity:1' />
    </linearGradient>
  </defs>";

# input: the text string
# "style" should be a JSON object (see for example the default ($dstyle));
# the style actually used is (default + style), i.e. whatever is specified in "style" wins.
# Defaults:
#  x: 0
#  y: 0
def text(x; y; style):
  . as $in
  | {"font-size": "40px", "text-align": "center", "text-anchor": "left", "fill": "black"} as $dstyle
  | (($dstyle + style) | to_s) as $style
  | "<text x='\(x//0)' y='\(y//0)' style='\($style)'>
       \(.)",
     "</text>";
Part 2: "Goodbye, World!"
def task:
  svg(null;null),                                                   # use the defaults
  linearGradient("gradient"; "rgb(255,255,0)"; "rgb(255,0,0)"),     # define "gradient"
  ("Goodbye, World!" | text(10; 50; {"fill": "url(#gradient)"})),   # notice how the default for "fill" is overridden
  "</svg>";

task
That is based on JSI CData, a blend of typed Javascript and C, interwoven via a preprocessor.
extensionJsiAgarGUI={// libAgar GUI from Jsi/* Alert popup, via libAgar and Jsish CData tectonics: jsish -c JsiAgar.jsc gcc `jsish -c -cflags true JsiAgar.so` `agar-config --cflags --libs` jsish -e 'require("JsiAgar"); JsiAgar.alert("Goodbye, World!");' */#include<agar/core.h>#include<agar/gui.h>/* Terminate on close */voidwindDown(AG_Event*event){AG_Terminate(0);}functionalert(msg:string):void{// Display a JsiAgar windowed message/* Native C code block (in a JSI function wrapper) */AG_Window*win;AG_Box*box;Jsi_RCrc=JSI_OK;if(AG_InitCore(NULL,0)==-1||AG_InitGraphics(0)==-1)return(JSI_ERROR);AG_BindStdGlobalKeys();win=AG_WindowNew(0);box=AG_BoxNew(win,AG_BOX_VERT,0);AG_LabelNewS(box,AG_LABEL_HFILL,msg);AG_ButtonNewFn(box,AG_BUTTON_HFILL,"Ok",AGWINDETACH(win),"%p",win);AG_SetEvent(win,"window-detached",windDown,NULL);AG_WindowShow(win);AG_EventLoop();AG_DestroyGraphics();AG_Destroy();returnrc;}};
Build rules are jsish -c preprocessor, query jsish for C compile time flags, compile the C, load the module into jsish via require.
And a window pops up with the message and an Ok button.
First command jsish -c runs a JSI to C preprocessor, generating a .h C source file.
For the second step, gcc is called with the output of a jsish -c -cflags true query, libagar runtime is linked in with more substitution for Agar compiler commands. The query output will be something like (this is site local, details will change per machine setup):
importjava.awt.*importjavax.swing.*funmain(args:Array<String>){JOptionPane.showMessageDialog(null,"Goodbye, World!")// in alert boxwith(JFrame("Goodbye, World!")){// on title barlayout=FlowLayout()add(JButton("Goodbye, World!"))// on buttonadd(JTextArea("Goodbye, World!"))// in editable areapack()defaultCloseOperation=JFrame.EXIT_ON_CLOSEisVisible=true}}
This image is a VI Snippet, an executable image of LabVIEW code. The LabVIEW version is shown on the top-right hand corner. You can download it, then drag-and-drop it onto the LabVIEW block diagram from a file browser, and it will appear as runnable, editable code.
To actually run this LÖVE-program, the following code
needs to be in a file main.lua, in its own folder.

This folder usually also contains other resources for a game,
such as pictures, sound, music, other source-files, etc.
To run the program, on windows,
drag that folder onto either love.exe
or a shortcut to love.exe.
A window with a click event to open a message box, and print returned number to window form, scrolling at the lower part of form's layer.
Module CheckIt {
      Declare Simple Form
      \\ we can define form before open
      Layer Simple {
            \\ center Window with 12pt font, 12000 twips width and 6000 twips height
            \\ ; at the end command to center the form in current screen
            Window 12, 12000, 6000;
            \\ make layer gray and split screen 0
            Cls #333333, 0
            \\   set split screen to 3rd line, like Cls ,2 without clear screen
            Scroll Split 2
            Cursor 0, 2
      }
      With Simple, "Title", "Hello Form"
      Function Simple.Click {
            Layer Simple {
                  \\ open msgbox
                  Print Ask("Hello World")
                  Refresh
            }
      }
      \\ now open as modal
      Method Simple, "Show", 1
      \\ now form deleted
      Declare Simple Nothing
}
CheckIt
A simple Window only
Module CheckIt {
      Declare Simple Form
      With Simple, "Title", "Hello World"
      Method Simple, "Show", 1
      Declare Simple Nothing
}
CheckIt
MODULE GUIHello EXPORTS Main;

IMPORT TextVBT, Trestle;

<*FATAL ANY*>

VAR v := TextVBT.New("Goodbye, World!");

BEGIN
  Trestle.Install(v);
  Trestle.AwaitDelete(v);
END GUIHello.
This code requires an m3makefile.
import ("ui")
implementation ("GUIHello")
program ("Hello")
This tells the compiler to link with the UI library, the file name of the implementation code, and to output a program named "Hello".
Whether the output is graphical or text depends largely the compiler with which the /.ROFF/ source code below is compiled.
If it is compiled with an Nroff compiler, its output is comparable to that of a typewriter.  Therefore, output from Nroff is typically seen on a text terminal.  If it is compiled with a Troff compiler, its output is comparable to that of a typesetter.  Therefore, output from Troff is typically seen on a PostScript or PDF output using a document viewer.  Furthermore, output from Troff is also usually seen on paper, so that may count as graphical as well.
In conclusion, although the code is compatible with both Nroff and Troff, it should be compiled using Troff to guarantee graphical output.
Because /.ROFF/ is a document formatting language in and of itself, it is extremely likely that a user of /.ROFF/ will be typing mostly textual content in a natural language.  Therefore, there are no special routines or procedures to be called to output normal text, as all text will get formatted onto paper automatically.
/* Tectonics: gcc -shared -fPIC -o nekoagar.ndll nekoagar.c `agar-config --cflags --libs`*//* Neko primitives for libAgar http://www.libagar.org */#include<stdio.h>#include<neko.h>#include<agar/core.h>#include<agar/gui.h>#define val_widget(v) ((AG_Widget *)val_data(v))DEFINE_KIND(k_agar_widget);/* Initialize Agar Core given appname and flags */valueagar_init_core(valueappname,valueflags){#ifdef DEBUGif(!val_is_null(appname))val_check(appname,string);val_check(flags,int);#endifif(AG_InitCore(val_string(appname),val_int(flags))==-1)returnalloc_bool(0);returnalloc_bool(1);}DEFINE_PRIM(agar_init_core,2);/* Initialize Agar GUI given graphic engine driver */valueagar_init_gui(valuedriver){#ifdef DEBUGif(!val_is_null(driver))val_check(driver,string);#endifif(AG_InitGraphics(val_string(driver))==-1)returnalloc_bool(0);AG_BindStdGlobalKeys();returnalloc_bool(1);}DEFINE_PRIM(agar_init_gui,1);/* Initialize Agar given appname, flags and GUI driver */valueagar_init(valueappname,valueflags,valuedriver){#ifdef DEBUGif(!val_is_null(appname))val_check(appname,string);val_check(flags,int);if(!val_is_null(driver))val_check(driver,string);#endifif(!val_bool(agar_init_core(appname,flags)))returnalloc_bool(0);if(!val_bool(agar_init_gui(driver)))returnalloc_bool(0);returnalloc_bool(1);}DEFINE_PRIM(agar_init,3);/* end the Agar event loop on window-close */voidrundown(AG_Event*event){AG_Terminate(0);}/* Create an Agar window, given UInt flags (which might use 32 bits...) */valueagar_window(valueflags){#ifdef DEBUGval_check(flags,int);#endifAG_Window*win;win=AG_WindowNew(val_int(flags));AG_SetEvent(win,"window-close",rundown,"%p",win);if(win==NULL)returnalloc_bool(0);returnalloc_abstract(k_agar_widget,win);}DEFINE_PRIM(agar_window,1);/* Show a window */valueagar_window_show(valuew){AG_Window*win;#ifdef DEBUGval_check_kind(w,k_agar_widget);#endifwin=(AG_Window*)val_widget(w);AG_WindowShow(win);returnalloc_bool(1);}DEFINE_PRIM(agar_window_show,1);/* New box */valueagar_box(valueparent,valuetype,valueflags){AG_Box*b;#ifdef DEBUGval_check_kind(parent,k_agar_widget);#endifb=AG_BoxNew(val_widget(parent),val_int(type),val_int(flags));returnalloc_abstract(k_agar_widget,b);}DEFINE_PRIM(agar_box,3);/* New label */valueagar_label(valueparent,valueflags,valuetext){AG_Label*lw;#ifdef DEBUGval_check_kind(parent,k_agar_widget);#endiflw=AG_LabelNewS(val_widget(parent),val_int(flags),val_string(text));returnalloc_abstract(k_agar_widget,lw);}DEFINE_PRIM(agar_label,3);/* Event Loop */valueagar_eventloop(void){intrc;rc=AG_EventLoop();returnalloc_int(rc);}DEFINE_PRIM(agar_eventloop,0);
The C file above is used to create a Neko friendly Dynamic Shared Object file, nekoagar.ndll.
The DSO functions are then loaded and exposed to Neko.
The Neko program follows:
/** <doc><pre> Hello world, graphical, in Neko, via Agar label Tectonics: gcc -shared -fPIC -o nekoagar.ndll rosetta-nekoagar.c `agar-config --cflags --libs` nekoc hello-graphical.neko neko hello-graphical </pre></doc>*//* Load some libagar bindings http://www.libagar.org/mdoc.cgi?man=AG_Intro.3 */varagar_init=$loader.loadprim("nekoagar@agar_init",3);varagar_window=$loader.loadprim("nekoagar@agar_window",1);varagar_window_show=$loader.loadprim("nekoagar@agar_window_show",1);varagar_box=$loader.loadprim("nekoagar@agar_box",3);varagar_label=$loader.loadprim("nekoagar@agar_label",3);varagar_eventloop=$loader.loadprim("nekoagar@agar_eventloop",0);/* Init with driver; NULL for best choice on current system */try{varrc=agar_init("nekoagar",0,val_null);if$not(rc)$throw("Error: agar_init non zero");}catche{$throw("Error: agar_init exception");}/* Put up a window, with a box, and a label in the box */varw=agar_window(0);varbox=agar_box(w,1,0);varlabel=agar_label(box,0,"Goodbye, World!");agar_window_show(w);/* Run the event loop */agar_eventloop();
NewLISP uses a lightweight Java GUI server that it communicates with over a pipe, similar how some languages use Tcl/Tk. This takes advantage of Java's cross platform GUI capability.
; hello-gui.lsp; oofoe 2012-01-18; Initialize GUI server.(load(append(env"NEWLISPDIR")"/guiserver.lsp"))(gs:init); Create window frame.(gs:frame'Goodbye100100300200"Goodbye!")(gs:set-resizable'Goodbyenil)(gs:set-flow-layout'Goodbye"center"); Add final message.(gs:label'Message"Goodbye, World!""center")(gs:add-to'Goodbye'Message); Show frame.(gs:set-visible'Goodbyetrue); Start event loop.(gs:listen)(exit); NewLisp normally goes to listener after running script.
; Nehal-Singhal 2018-06-05>(!"dialog --msgbox GoodbyeWorld! 5 20"); A dialog message box appears on terminal similar to yes/no box.
Requires a Glade GUI description file. 'ere be one I produced earlier:
<?xml version="1.0" standalone="no"?><!--*- mode: xml -*--><!DOCTYPE glade-interface SYSTEM "http://glade.gnome.org/glade-2.24.dtd"><glade-interface><widgetclass="GtkWindow"id="hworld"><propertyname="visible">True</property><propertyname="title">HelloWorld</property><propertyname="modal">False</property><propertyname="resizable">True</property><propertyname="default_width">200</property><propertyname="default_height">100</property><signalname="delete_event"handler="on_hworld_delete_event"/><child><widgetclass="GtkLabel"id="label1"><propertyname="visible">True</property><propertyname="can_focus">False</property><propertyname="label"translatable="yes">Farewell,cruelworld.</property></widget></child></widget></glade-interface>
And finally the Oxygene:
// Display a Message in a GUI Window
//
// Nigel Galloway, April 18th., 2012.
//
namespace HelloWorldGUI;

interface

uses
  Glade, Gtk, System;

type
  Program = public static class
  public
    class method Main(args: array of String);
  end;

  MainForm = class(System.Object)
  private
    var
      [Widget] hworld: Gtk.Window;
  public
    constructor(args: array of String);
    method on_hworld_delete_event(aSender: Object; args: DeleteEventArgs);
  end;

implementation

class method Program.Main(args: array of String);
begin
  new MainForm(args);
end;

constructor MainForm(args: array of String);
begin
  inherited constructor;
  Application.Init();
  with myG := new Glade.XML(nil, 'HelloWorldGUI.Main.glade', 'hworld', nil) do myG.Autoconnect(self);
  Application.Run();
end;

method MainForm.on_hworld_delete_event(aSender: Object; args: DeleteEventArgs);
begin
  Application.Quit();
end;

end.
namespace HelloWorldNET;

interface

type
  App = class
  public
    class method Main;
  end;

implementation

class method App.Main;
begin
  System.Windows.MessageBox.Show("Farewell cruel world");
end;

end.
You can run this online here. A few improvements are probably warranted, as in changes to pGUI.js and/or pGUI.css, but at least the language/transpiler side of things is pretty much complete.
if(!class_exists('gtk')){die("Please load the php-gtk2 module in your php.ini\r\n");}$wnd=newGtkWindow();$wnd->set_title('Goodbye world');$wnd->connect_simple('destroy',array('gtk','main_quit'));$lblHello=newGtkLabel("Goodbye, World!");$wnd->add($lblHello);$wnd->show_all();Gtk::main();
programa{// includes graphics library and use an aliasincluabibliotecaGraficos-->g// define WIDTH and HEIGHT integer constantsconstinteiroWIDTH=200constinteiroHEIGHT=100// main entryfuncaoinicio(){// begin graphical mode (verdadeiro = true)g.iniciar_modo_grafico(verdadeiro)// define window titleg.definir_titulo_janela("Hello")// define window dimesionsg.definir_dimensoes_janela(WIDTH,HEIGHT)// while loopenquanto(verdadeiro){// define color to black(preto) and clear windowg.definir_cor(g.COR_PRETO)g.limpar()// define color to white(branco)g.definir_cor(g.COR_BRANCO)// set text font sizeg.definir_tamanho_texto(32.0)// draws textg.desenhar_texto(0,HEIGHT/3,"Hello, world!")// calls render functiong.renderizar()}// end graphical modeg.encerrar_modo_grafico()}}
In the general Postscript context, the show command will render the string that is topmost on the stack at the currentpoint in the previously setfont. Thus a minimal PostScript file that will print on a PostScript printer or previewer might look like this:
%!PS% render in Helvetica, 12pt:/Helveticafindfont12scalefontsetfont% somewhere in the lower left-hand corner:50dupmoveto% render text(Goodbye, World!)show% wrap up page display:showpage
While there is no easy (intuitive) way to print a comma (or semicolon) this pd script will do.
When writing messages to the terminal window, Pd prepends the name of the print object and a colon, or "print: " if no name is specified, which can be avoided by using "-n" instead of a name. This behaviour, however, has not been adopted by Pd-extended :-(
import bpy

# select default cube
bpy.data.objects['Cube'].select_set(True)

# delete default cube
bpy.ops.object.delete(True)

# add text to Blender scene
bpy.data.curves.new(type="FONT", name="Font Curve").body = "Hello World"
font_obj = bpy.data.objects.new(name="Font Object", object_data=bpy.data.curves["Font Curve"])
bpy.context.scene.collection.objects.link(font_obj)

# camera center to text
bpy.context.scene.camera.location = (2.5,0.3,10)

# camera orient angle to text
bpy.context.scene.camera.rotation_euler = (0,0,0)

# change 3D scene to view from the camera
area = next(area for area in bpy.context.screen.areas if area.type == 'VIEW_3D')
area.spaces[0].region_3d.view_perspective = 'CAMERA'
 #lang racket/gui
(require racket/gui/base)

; Make a frame by instantiating the frame% class
(define frame (new frame% [label "Goodbye, World!"]))

; Make a static text message in the frame
(define msg (new message% [parent frame]
                          [label "No events so far..."]))

; Make a button in the frame
(new button% [parent frame]
             [label "Click Me"]
             ; Callback procedure for a button click:
             (callback (lambda (button event)
                         (send msg set-label "Button click"))))

; Show the frame by calling its show method
(send frame show #t)
/*REXX (using PC/REXX)  to display a message in a window (which is bordered). */
if fcnPkg('rxWindow') ¬== 1  then do
                                  say 'RXWINDOW function package not loaded.'
                                  exit 13
                                  end
if pcVideo()==3  then normal= 7
                 else normal=13

window#=w_open(1, 1, 3, 80, normal)
call w_border  window#
call w_put     window#, 2, 2, center("Goodbye, World!", 80-2)

                                       /*stick a fork in it, all we're done. */
and it creates two windows, the first (main) window contains the   Goodbye, World!   text,

the other "help" window contains a message about how to close the windows.
/*REXX program shows a "hello world" window (and another to show how to close)*/
parse upper version !ver .;     !pcrexx= !ver=='REXX/PERSONAL' | !ver=='REXX/PC'
if ¬!pcrexx  then call ser  "This isn't PC/REXX"     /*this isn't  PC/REXX ?  */
rxWin=fcnPkg('rxwindow')                             /*is the function around?*/

if rxWin¬==1  then do 1;     'RXWINDOW  /q'
                   if fcnPkg('rxwindow')==1 then leave   /*the function is OK.*/
                   say 'error loading RXWINDOW !';     exit 13
                   end

top=1;         normal=31;       border=30;   curpos=cursor()
width=40;      height=11;       line.=;      line.1= 'Goodbye, World!'
w=w_open(2, 3, height+2, width, normal);     call w_border  w,,,,,border
helpLine= 'press the  ESC  key to quit.'
helpW=w_open(2, 50, 3, length(helpLine)+4, normal)
call w_border helpw,,,,,border;  call w_put helpW, 2, 3, helpLine
call w_hide w, 'n'
                             do k=0  to height-1
                             _=top+k;      call w_put w, k+2, 3, line._, width-4
                             end   /*k*/
call w_unhide w
                             do forever;   if inKey()=='1b'x  then leave;  end
                                                   /*   ↑                     */
call w_close  w                                    /*   └──◄ the  ESCape  key.*/
call w_close  helpw
if rxWin¬==1  then 'RXUNLOAD rxwindow'
parse var curPos row  col
call      cursor row, col
                                       /*stick a fork in it,  we're all done. */
This example waits until the mouse is clicked for the program to end. This can be useful if the program executes too fast for "Hello world!" to be visible on the screen long enough for it to be comfortable.
Seed7 does not work with an event handling function like gtk_main().
The progam stays in control and does not depend on callbacks.
The graphic library manages redraw, keyboard and mouse events.
The contents of a window are automatically restored when it is
uncovered. It is possible to copy areas from a window even when
the area is currently covered or off screen.
$ include "seed7_05.s7i";
  include "draw.s7i";
  include "keybd.s7i";
  include "bitmapfont.s7i";
  include "stdfont24.s7i";
  include "pixmap_file.s7i";

const proc: main is func
  local
    var text: screen is STD_NULL;
  begin
    screen(400, 100);
    clear(curr_win, white);
    KEYBOARD := GRAPH_KEYBOARD;
    screen := openPixmapFontFile(curr_win);
    color(screen, black, white);
    setFont(screen, stdFont24);
    setPosXY(screen, 68,  60);
    write(screen, "Goodbye, World");
    ignore(getc(KEYBOARD));
  end func;
The gui module is an optional module when you compile the slope interpreter. With the module installed the following will produce a window with the text "Hello, world!" and the title of the window will be "Hello".
Ok, I know this is cheating. But it isn't completely cheating: the SSEM uses Williams tube storage, so the memory is basically a CRT device; and this is an executable program, up to a point, because the first line includes a 111 Stop instruction (disguised as a little flourish joining the tops of the d and the b).
Once you've keyed it in, the first eighteen words of storage will look a bit like this:
oo ooo
o o o
o ooo ooo ooo ooo o o ooo
o o o o o o o o o o o o o
o o o o o o o o o o o ooo
o ooo ooo ooo ooo oo o o
o o oo o
o oo o o
oo o o
o o o o o o
o o o o o o
o o o ooo ooo o ooo o
o o o o o o o o o o
o o o o o o o o o
o o o ooo o oo ooo o
oo oo
Note: If you name this program "button.tcl", you might get strange errors.
Don't use the name of any internal tcl/tk-command as a filename for a tcl-script.
The following code is altered from the TheIDE example page. It displays a blank GUI with a menu. Click on about from the menu and the goodbye world prompt appears.
#include <CtrlLib/CtrlLib.h>
// submitted by Aykayayciti (Earl Lamont Montgomery)
using namespace Upp;
class GoodbyeWorld : public TopWindow {
MenuBar menu;
StatusBar status;
void FileMenu(Bar& bar);
void MainMenu(Bar& bar);
void About();
public:
typedef GoodbyeWorld CLASSNAME;
GoodbyeWorld();
};
void GoodbyeWorld::About()
{
PromptOK("{{1@5 [@9= This is the]::@2 [A5@0 Ultimate`+`+ Goodbye World sample}}");
}
void GoodbyeWorld::FileMenu(Bar& bar)
{
bar.Add("About..", THISBACK(About));
bar.Separator();
bar.Add("Exit", THISBACK(Close));
}
void GoodbyeWorld::MainMenu(Bar& bar)
{
menu.Add("File", THISBACK(FileMenu));
}
GoodbyeWorld::GoodbyeWorld()
{
AddFrame(menu);
AddFrame(status);
menu.Set(THISBACK(MainMenu));
status = "So long from the Ultimate++ !";
}
GUI_APP_MAIN
{
SetLanguage(LNG_ENGLISH);
GoodbyeWorld().Run();
}
@1Introduction.
Define the structure of the program.
@aPROGRAM goodbye world CONTEXT VOID USE standard
BEGIN
@<Included declarations@>
@<Logic at the top level@>
END
FINISH
@ Include the graphical header file.
@iforms.w@>
@ Program code.
@<Logic...@>=
open(LOC FILE,"",arg channel);
fl initialize(argc,argv,NIL,0);
fl show messages("Goodbye World!");
fl finish
@ Declare the necessary macros.
@<Include...@>=
macro fl initialize;
macro fl show messages;
macro fl finish;
@ The end.
This example used the Windows MessageBox function to do the work for us.
Windows uses the stdcall calling convention where the caller pushes
function parameters onto the stack and the stack has been fixed up
when the callee returns.
;use win32ax for 32 bit
;use win64ax for 64 bit
include 'win64ax.inc'
.code
start:
invoke MessageBox,HWND_DESKTOP,"Goodbye,World!","Goodbye",MB_OK
invoke ExitProcess,0
.end start
option casemap:none
printf proto :qword, :vararg
exit proto :dword
;; curses.h stuff
initscr proto ;; WINDOW *initsrc(void);
endwin proto ;; int endwin(void);
start_color proto ;; int start_color(void);
wrefresh proto :qword ;; int wrefresh(WINDOW *w);
wgetch proto :qword ;; int wgetch(WINDOW *w)
waddnstr proto :qword, :qword, :dword ;; int waddnstr(WINDOW *w, const char *str, int n);
;; Just a wrapper to make printing easier..
println proto :qword, :qword
.code
main proc
local stdscr:qword
call initscr
mov stdscr, rax
call start_color
invoke println, stdscr, CSTR("Goodbye, World!",10)
invoke wgetch, stdscr
call endwin
invoke exit, 0
ret
main endp
println proc wnd:qword, pstr:qword
invoke waddnstr, wnd, pstr, -1
invoke wrefresh, wnd
ret
println endp
end


