
Color of a screen pixel

You are encouraged to solve this task according to the task description, using any language you may know.
- Task
Get color information from an arbitrary pixel on the screen, such as the current location of the mouse cursor.
The mouse cursor may or may not have to be active in a GUI created by your program. These functions are OS related.
6502 Assembly
How this is done, and whether this is even possible, depends entirely on your video hardware (some machines such as the NES cannot control color data or graphics data at the pixel level.) And good luck trying to explain how this works on the Apple II.
easy6502/6502js
Video memory is mapped into $0200-$05ff, and the bottom 4 bits of each byte represent the pixel's color.
LDA $0200 ;get the color of the top-left pixel of the screen
LDA $05FF ;get the color of the bottom-right pixel of the screen.
Nintendo Entertainment System
The NES can't determine the color of a single pixel. The closest you can get is a 16 pixel by 16 pixel section of graphics. And that only tells you the palette in use at that location, not the actual color. Color cells are 2 bits per 16x16 section, in the order of top-left, top-right, bottom-left, bottom-right.
;this code will fail to produce the desired result unless it executes during vblank or forced blank.
;address $23C0 = first color cell of nametable $2000
LDA #$23
STA $2006
LDA #$C0
STA $2006

LDA $2007
AND #%11000000 ;00------ = top-left corner uses palette 0, 01------ = top-left corner uses palette 1, etc.
This code assumes no scrolling has taken place, as it only reads the color cells from the top-left nametable. Generally speaking, reading VRAM in this way is not a good practice, as it's very slow and can only be done during vBlank when you have better things to do. For an actual game, it's much easier to keep a shadow of this data in normal RAM and read that instead, and pretend that VRAM is write-only.
8086 Assembly
With Interrupts
MS-DOS has a built-in way to calculate the color of a pixel on-screen.
;input: cx = x coordinate of pixel, dx = y coordinate of pixel, bh = page number
mov ah,0Dh
int 10h
The color is returned in AL.
Action!
PROC Main()
  BYTE POINTER ptr
  BYTE
    w=[160],h=[160],x=[0],y=[0],c,k,update=[1],
    CH=$02FC ;Internal hardware value for last key pressed
  CARD size=[6400],i

  Graphics(15) ;Graphics 160x160 with 4 colors with text window
  ptr=PeekC(88)

  ; Fill screen with random colors
  FOR i=1 TO size
  DO
    ptr^=Rand(0)
    ptr==+1
  OD

  PrintE("Use arrow keys to change position and Esc to exit.")
  DO
    IF update THEN
      c=Locate(x,y)
      PrintF("x=%B y=%B c=%B%E",x,y,c)
    FI

    k=CH
    CH=$FF
    update=1
    IF k=134 THEN
      IF x=0 THEN x=w-1
      ELSE x==-1 FI
    ELSEIF k=135 THEN
      IF x=w-1 THEN x=0
      ELSE x==+1 FI
    ELSEIF k=142 THEN
      IF y=0 THEN y=h-1
      ELSE y==-1 FI
    ELSEIF k=143 THEN
      IF y=h-1 THEN y=0
      ELSE y==+1 FI
    ELSEIF k=28 THEN
      EXIT
    ELSE
      update=0
    FI
  OD
RETURN- Output:
Screenshot from Atari 8-bit computer
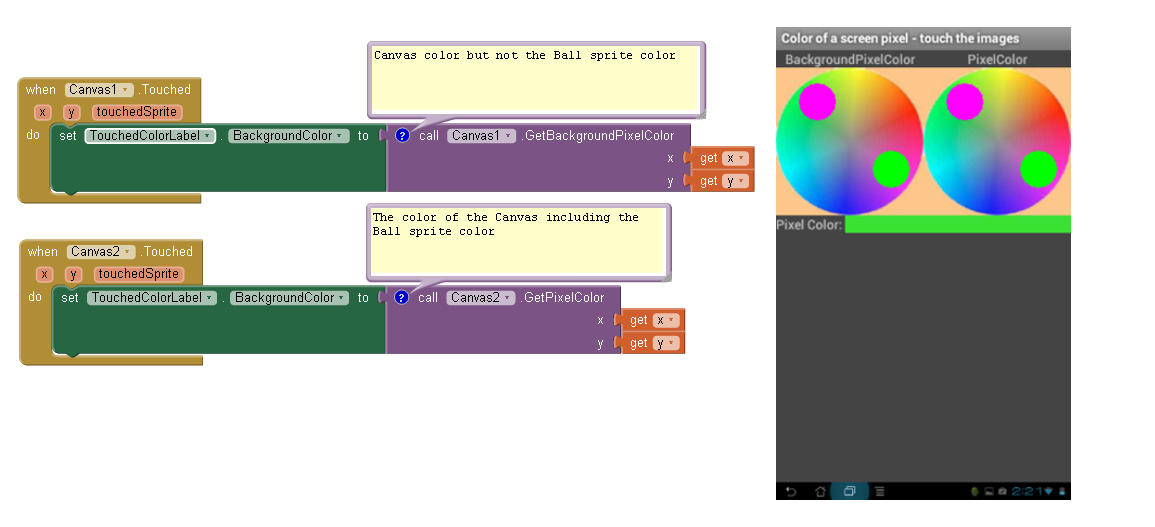
App Inventor
App Inventor has two Canvas blocks to determine the color under a pixel.
GetBackgroundPixelColor returns a color from the Canvas but ignores Ball sprites and ImageSprites.
GetPixelColor returns a color from either the Canvas or a Ball sprite or ImageSprite.
In the app's display below, the purple Ball sprite was touched on the left canvas, but the pixel color (green) returned was from the area below it.
<VIEW THE BLOCKS AND ANDROID APP DISPLAY>
AutoHotkey
PixelGetColor, color, %X%, %Y%
AutoIt
Opt('MouseCoordMode',1)  ; 1 = (default) absolute screen coordinates
$pos = MouseGetPos()
$c   = PixelGetColor($pos[0], $pos[1])
ConsoleWrite("Color at x=" & $pos[0] & ",y=" & $pos[1] & _
		" ==> " & $c & " = 0x" & Hex($c) & @CRLF)
- Output:
Color at x=3,y=733 ==> 3829413 = 0x003A6EA5
Axe
Disp pxl-Test(50,50)▶Dec,iBaCon
BaCon can make use of the High Performance Canvas include. Outside this canvas it needs to access XLib API functions.
INCLUDE canvas
FULLSCREEN
color = GETINK(100, 100, 4)
WAITKEY
BASIC
AmigaBASIC
MOUSE ON

WHILE 1
  m=MOUSE(0)
  PRINT POINT(MOUSE(1),MOUSE(2))
WEND
(The color index is -1 if the mouse pointer is outside the Basic window.)
Applesoft BASIC
Low-Resolution (Lo-Res) graphics 40x48, 16 colors, page 1
X =  PDL (0) * 5 / 32
Y =  PDL (1) * 3 / 16
 COLOR=  SCRN( X,Y)
Hi-Resolution (Hi-Res) graphics 280x192, 6 colors
There is no HSCRN( X,Y) function in Applesoft. What follows is an elaborate subroutine that determines the hi-res color at the location given by variables X and Y on the current hi-res page. A color value in the range from 0 to 7 is returned in the variable C. The color is determined by peeking at adjacent pixels and the Most Significant Bit MSB. The VTAB routine is used as an aid to calculate the address of pixels. Other colors beyond the 6 hi-res colors can be displayed by positioning pixels at byte boundaries using the MSB. This routine is limited to the eight hi-res colors.
 100  REM GET HCOLOR
 110  REM  PARAMETERS: X Y
 120  REM  RETURNS: C
 130  REM
 140 P = 0:X = X + 1
 150  ON (X < 280) GOSUB 300
 160 PR = P:P = 0:X = X - 2
 170  ON (X >  = 0) GOSUB 300
 180 PL = P:X = X + 1: GOSUB 300
 190 ODD = X -  INT (X / 2) * 2
 200 C = H * 4
 210  IF  NOT ((PL = PR) AND (PL <  > P)) THEN C = C + P * 3: RETURN
 220  IF ODD THEN P =  NOT P
 230 C = C + P + 1
 240  RETURN
 250  REM
 260  REM GET PIXEL
 270  REM  PARAMETERS: X Y
 280  REM  RETURNS: H P
 290  REM
 300 H =  INT (X / 7)
 310 V =  INT (Y / 8)
 320 VO =  PEEK (37)
 330 HO =  PEEK (36)
 340  VTAB V + 1: HTAB 1
 350 A =  PEEK (41) * 256
 360 A = A +  PEEK (40) + H
 370  VTAB VO + 1: HTAB HO + 1
 380 A = A + 8192 - 1024
 390 P =  PEEK (230) / 32
 400  IF P = 2 THEN A = A + 8192
 410 A = A + (Y - V * 8) * 1024
 420 B = X - H * 7
 430 V =  PEEK (A)
 440 H =  INT (V / 128)
 450 V =  INT (V / (2 ^ B))
 460 P = V -  INT (V / 2) * 2
 470  RETURN

X = 267 : Y =  166 : GOSUB 100
HCOLOR=  C
BBC BASIC
In BBC BASIC for Windows you can read either the 'logical colour' (palette index) or the 'true colour' (24-bit RGB value).
      palette_index% = POINT(x%, y%)
      RGB24b_colour% = TINT(x%, y%)
Commodore BASIC
Example 1: Commodore 64
There are no graphics commands in Commodore 64 BASIC. High resolution (hires) graphics are programmed by directly manipulating the hardware registers and memory.
The Commodore 64 hires bitmap is 320×200, subdivided into 8×8 cells starting at the top left and moving right. Each cell is addressed top to bottom by 8 bytes. Each byte controls a horizontal row of 8 bits. This requires calculation on the programmer's part to translate X,Y coordinates into a specific memory address/value combination (lines 1210 through 1220).
5 rem commodore 64 example
10 base=2*4096:x=100:y=50:poke53280,0
20 gosub 1000:print chr$(147);
30 bg=11:fg=1:rem set foreground and background colors
40 for i=1024 to 1503:poke i,fg*16+bg:next
50 for i=base to base+7990:poke i,0:next
60 gosub 1200
70 poke byte, peek(byte) or 2^bit
80 print"{home}{crsr-down 14}";
90 px=((peek(byte) and 2^bit)>0)
100 co=peek(cb)and(15+(-225*px)):if px then co=co/16
110 print"pixel color at";x;"{crsr-left},";y;"{crsr-left}:";co;"{crsr-left} "
120 getk$:ifk$=""then 120
130 gosub 1100:end
1000 rem turn on graphics
1010 poke53272,peek(53272) or 8
1020 poke53265,peek(53265) or 32
1030 return
1100 rem turn off graphics
1110 poke53265,peek(53265) and 223
1120 poke53272,peek(53272) and 247
1130 return
1200 rem convert x-y into mem location
1210 ro=int(y/8):ch=int(x/8):li=y and 7
1220 bit=7-(x and 7):byte=base+ro*320+char*8+li:cb=1024+ro+ch
1230 return
Example 2: Commodore Plus 4 and 128
On both machines, there is a split graphics-text screen that can be used, and the extended BASIC provides functions for reading pixel and color values from the bitmap.
10 color 0,1:color 1,3: rem set border to black and pixel color to red
15 graphic 2,1: rem enter split graphics/text mode and clear screen
20 draw 1,100,50 : rem plot pixel at 100,50
30 print "pixel color at";rdot(0);",";rdot(1);"is";rclr(rdot(2))
40 get k$:if k$="" then 40
50 graphic 0,1 : rem return to text mode
FreeBASIC
This is a very simple example from the FreeBASIC documentation. To obtain the color of an arbitrary screen pixel (i.e. outside the graphics screen controlled by FB) one would need to use API functions.
FB 1.05.0 Win64

' Set an appropriate screen mode - 320 x 240 x 8bpp indexed color
ScreenRes 320, 240, 8

' Draw a line using color 12 (light red)
Line (20,20)-(100,100), 12

' Print the color of a point on the line
Print Point(20,20)  '' prints 12

' Sleep before the program closes
Sleep
QuickBASIC
In a graphics mode (for instance, SCREEN 13 or SCREEN 12)
color = point(x, y)
Integer BASIC
See Applesoft BASIC.
Liberty BASIC
'This example requires the Windows API
Struct point, x As long, y As long

hDC = GetDC(0)
result = GetCursorPos()
Print GetPixel(hDC, point.x.struct, point.y.struct)
Call ReleaseDC 0, hDC
End


    Sub ReleaseDC hWnd, hDC
        CallDLL #user32,"ReleaseDC", hWnd As uLong, hDC As uLong, ret As Long
    End Sub

    Function GetDC(hWnd)
        CallDLL #user32, "GetDC", hWnd As uLong, GetDC As uLong
    End Function

    Function GetCursorPos()
        CallDLL #user32, "GetCursorPos", point As struct, GetCursorPos As uLong
    End Function

    Function GetPixel(hDC, x, y)
        CallDLL #gdi32, "GetPixel", hDC As uLong, x As long, y As long, GetPixel As long
    End Function
Locomotive Basic
10 x=320:y=200
20 color=TEST(x,y)
30 PRINT "Pen color at"; x; y; "is"; color
PureBasic
Return the color used at the x,y position in the current output. If the current output has an alpha channel then the result will be a 32bit RGBA value, otherwise it will be a 24bit RGB value. The color can be split in their RGB and alpha values by using the Red(), Green(), Blue() and Alpha() functions.
Color = Point(x, y)
To get the colour of a pixel on the screen when it is not managed by PureBasic (ie. from other programs' windows), it is necessary to use Windows API. This works only under Windows.
hDC = GetDC_(0)
Color = GetPixel_(hDC, x, y)
ReleaseDC_(0, hDC)
This work fine!!
poz.point
If OpenWindow(0,0,0,100,45,"Get pixel color at cursor position",#PB_Window_MinimizeGadget)
  TextGadget(0,0,0,50,12,"Red: ")
  TextGadget(1,0,15,50,12,"Green: ")
  TextGadget(2,0,30,50,12,"Blue: ")
  TextGadget(3,50,0,50,12,"")
  TextGadget(4,50,15,50,12,"")
  TextGadget(5,50,30,50,12,"")
 hDC = GetDC_(0)
 Repeat
  oldx=poz\x
  oldy=poz\y
GetCursorPos_(@poz)
Color = GetPixel_(hDC, poz\x, poz\y)
If poz\x<>oldx Or poz\y<>oldy
  SetGadgetText(3,Str(Red(color)))
  SetGadgetText(4,Str(Green(color)))
  SetGadgetText(5,Str(Blue(color)))
EndIf
event=WaitWindowEvent(200)
Until event=#PB_Event_CloseWindow
ReleaseDC_(0, hDC)
EndIf
QBasic
'Example: Find color of a screen pixel in QBasic (adapted from QBasic Help file).
'  POINT(x%, y%)  returns color of pixel at coordinates x,y.
SCREEN 7   'Choose color graphics screen (1,2,4,7,8,9,11,12,13).
LINE (0, 0)-(100, 100), 2  'Draw diagonal line in color attribute 2.
LOCATE 14, 1               'Locate below diagonal line to show output.
FOR y% = 1 TO 10
  FOR x% = 1 TO 10
    PRINT POINT(x%, y%);   'POINT(x%, y%) displays pixel color.
  NEXT x%
  PRINT
NEXT y%
END
BASIC256
color rgb(0, 255, 0)
rect 50, 50, 75, 75

color rgb(255, 0, 0)
line (20,20,100,100)

x = 60 : y = 50

c = pixel(x, y)
rojo = (c & 0xff0000) \ 0x10000
verde = (c & 0xff00) \ 0x100
azul = (c & 0xff)

print rojo; " "; verde; " "; azul
SmileBASIC
DEF GETPX X,Y OUT R,G,B
 PCOL=GSPOIT(X,Y)
 RGBREAD PCOL OUT R,G,B
END
TI-89 BASIC
Only the graph screen can be read.
pxlTest(y, x) © returns booleanVisual Basic .NET
  Private Function GetPixelColor(ByVal Location As Point) As Color

    Dim b As New Bitmap(1, 1)
    Dim g As Graphics = Graphics.FromImage(b)

    g.CopyFromScreen(Location, Point.Empty, New Size(1, 1))

    Return b.GetPixel(0, 0)

  End Function
VBA
In "pure" Visual Basic for Application, there is no way to find the color of a screen pixel. We have to use api's functions. This code should be adapted for 64 bits versions...
Option Explicit

Private Type POINTAPI
    x As Long
    y As Long
End Type

Private Declare Function GetPixel Lib "gdi32" (ByVal hdc As Long, ByVal x As Long, ByVal y As Long) As Long
Private Declare Function GetCursorPos Lib "USER32" (lpPoint As POINTAPI) As Long
Private Declare Function GetWindowDC Lib "USER32" (ByVal hWnd As Long) As Long

Sub Color_of_a_screen_pixel()
Dim myColor As Long
    myColor = Get_Color_Under_Cursor
End Sub

Function Get_Color_Under_Cursor() As Long
Dim Pos As POINTAPI, lngDc As Long

    lngDc = GetWindowDC(0)
    GetCursorPos Pos
    Get_Color_Under_Cursor = GetPixel(lngDc, Pos.x, Pos.y)
End Function
Yabasic
open window 100, 100
backcolor 255, 0, 0
clear window
color 0, 255, 0
fill rectangle 50, 50, 75, 75

x = 60 : y = 60

s$ = right$(getbit$(x, y, x, y), 6)
blue = dec(right$(s$, 2))
green = dec(mid$(s$, 3, 2))
red = dec(left$(s$, 2))

print red, " ", green, " ", blue
ZX Spectrum Basic
The built-in function POINT (x,y) returns 0 if the pixel at x,y is set to the relevant PAPER colour, or 1 if it is set to the INK colour. (Note that there can only be a maximum of two colours in each 8x8-pixel section of the screen.)
C
#include <X11/Xlib.h>
void
get_pixel_color (Display *d, int x, int y, XColor *color)
{
  XImage *image;
  image = XGetImage (d, RootWindow (d, DefaultScreen (d)), x, y, 1, 1, AllPlanes, XYPixmap);
  color->pixel = XGetPixel (image, 0, 0);
  XFree (image);
  XQueryColor (d, DefaultColormap(d, DefaultScreen (d)), color);
}

// Your code
XColor c;
get_pixel_color (display, 30, 40, &c);
printf ("%d %d %d\n", c.red, c.green, c.blue);
(Linux users, see grabc.)
#include <Windows.h>

COLORREF getColorAtCursor(void) {
    POINT p;
    COLORREF color;
    HDC hDC;
    BOOL b;

    /* Get the device context for the screen */
    hDC = GetDC(NULL);
    if (hDC == NULL)
        return CLR_INVALID;

    /* Get the current cursor position */
    b = GetCursorPos(&p);
    if (!b)
        return CLR_INVALID;

    /* Retrieve the color at that position */
    color = GetPixel(hDC, p.x, p.y);

    /* Release the device context again */
    ReleaseDC(GetDesktopWindow(), hDC);

    return color;
}
C#
using System;
using System.Drawing;
using System.Windows.Forms;

class Program
{
    static Color GetPixel(Point position)
    {
        using (var bitmap = new Bitmap(1, 1))
        {
            using (var graphics = Graphics.FromImage(bitmap))
            {
                graphics.CopyFromScreen(position, new Point(0, 0), new Size(1, 1));
            }
            return bitmap.GetPixel(0, 0);
        }
    }

    static void Main()
    {
        Console.WriteLine(GetPixel(Cursor.Position));
    }
}
Sample output:
Color [A=255, R=243, G=242, B=231]
C++/CLI
using namespace System;
using namespace System::Drawing;
using namespace System::Windows::Forms;

[STAThreadAttribute]
int main()
{
	Point^ MousePoint = gcnew Point();
	Control^ TempControl = gcnew Control();
	MousePoint = TempControl->MousePosition;
	Bitmap^ TempBitmap = gcnew Bitmap(1,1);
	Graphics^ g = Graphics::FromImage(TempBitmap);
	g->CopyFromScreen((Point)MousePoint, Point(0, 0), Size(1, 1));
	Color color = TempBitmap->GetPixel(0,0);
	Console::WriteLine("R: "+color.R.ToString());
	Console::WriteLine("G: "+color.G.ToString());
	Console::WriteLine("B: "+color.B.ToString());
}
Clojure
(defn get-color-at [x y]
  (.getPixelColor (java.awt.Robot.) x y))
Common Lisp
Using Allegro and their Common Graphics package
(in-package :cg-user)

(defun print-hex (n)
  (let ((*print-base* 16.) (*print-radix* t))
    (print n)) t)

(defun get-byte (n byte)
  (logand (ash n (* byte -8)) #xFF))

(defun get-pixel (x y)
  (let ((pixval (caar (contents (get-screen-pixmap :box (make-box x y (+ x 1) (+ y 1)))))))
    (mapcar #'(lambda (i) (get-byte pixval i)) '(2 1 0 3))))

(defun get-mouse-pixel ()
  (let ((pos (cursor-position (screen *system*))))
    (get-pixel (position-x pos) (position-y pos))))

(print-hex (get-mouse-pixel))
Sample output: (values are in RGBA order):
(#xe0 #x43 #x43 #xff)
Delphi
program ScreenPixel;

{$APPTYPE CONSOLE}

uses
  Windows,
  SysUtils,
  Graphics;


// Use this function in a GUI application to return the color
function GetPixelColourAsColor(const PixelCoords: TPoint): TColor;
var
  dc: HDC;
begin
  // Get Device Context of windows desktop
  dc := GetDC(0);
  // Read the color of the pixel at the given coordinates
  Result := GetPixel(dc,PixelCoords.X,PixelCoords.Y);
end;

// Use this function to get a string representation of the current colour
function GetPixelColourAsString(const PixelCoords: TPoint): string;
var
  r,g,b: Byte;
  col: TColor;
begin
  col := GetPixelColourAsColor(PixelCoords);

  // Convert the Delphi TColor value to it's RGB components
  r := col and $FF;
  g := (col shr 8) and $FF;
  b := (col shr 16) and $FF;

  // Format the result
  Result := 'R('+IntToStr(r)+') G('+IntToStr(g)+') G('+IntToStr(b)+')';

  {
    Alternatively, format the result as follows to get a
    string representation of the Delphi TColor value

    Result := ColorToString(GetPixel(dc,curP.X,curP.Y));
  }

end;

var
  s: string;
  P: TPoint;
begin
  s := '';

  Writeln('Move mouse over a pixel. Hit return to get colour of selected pixel.');

  repeat
    Readln(s);
    if s = '' then
      begin
        GetCursorPos(P);
        Writeln('Colour at cursor position X:'+
                IntToStr(P.X)+' Y:'+
                IntToStr(P.Y) +' = '+
                GetPixelColourAsString(P)
                );
        Writeln('');
        Writeln('Move mouse and hit enter again.');
      end;
  until
    SameText(s,'quit');

end.
Example output:
Move mouse over a pixel. Hit return to get colour of selected pixel.

Colour at cursor position X:429 Y:161 = R(0) G(0) B(0)

Move mouse and hit enter again.

Colour at cursor position X:942 Y:358 = R(182) G(206) B(231)

Move mouse and hit enter again.

Colour at cursor position X:704 Y:103 = R(240) G(240) B(240)

Move mouse and hit enter again.

Colour at cursor position X:2756 Y:59 = R(250) G(196) B(182)
F#
open System.Drawing
open System.Windows.Forms

let GetPixel x y =
    use img = new Bitmap(1,1)
    use g = Graphics.FromImage(img)
    g.CopyFromScreen(new Point(x,y), new Point(0,0), new Size(1,1))
    let clr = img.GetPixel(0,0)
    (clr.R, clr.G, clr.B)

let GetPixelAtMouse () =
    let pt = Cursor.Position
    GetPixel pt.X pt.Y
FutureBasic
Tracks color information of the pixel under the current mouse x/y coordinates.
_window = 1
begin enum 1
  _view
  _colorWell
  _imageView
end enum

void local fn BuildWindow
  window _window, @"ColorUnderMouse", (0,0,500,400), NSWindowStyleMaskTitled + NSWindowStyleMaskClosable
  view subclass _view, (0,0,500,300)
  colorwell _colorWell, YES, fn ColorWhite, ( 410, 310, 70, 70 ), NO, _window
end fn

void local fn DrawRect
  CFArrayRef array = @[fn ColorRed, fn ColorOrange, fn ColorYellow, fn ColorGreen, fn ColorBlue, fn ColorWithRGB(0,0.29,0.51,1), fn ColorWithRGB(0.58,0.0,0.83,1)]
  GradientRef grad = fn GradientWithColors( array )
  GradientDrawInRect( grad, fn ViewFrame(_view), 0 )
end fn


void local fn DoMouse( tag as NSInteger )
  CGPoint pt = fn EventLocationInView( tag )
  ColorRef color = fn ViewColorAtPoint( tag, pt )

  ColorWellSetColor( _colorWell, color )

  cls : printf @"%.0fx, %.0fy, %@", pt.x, pt.y, color
end fn

void local fn DoDialog( ev as long, tag as long )
  select ( tag )
    case _view
      select ( ev )
        case _viewDrawRect     : fn DrawRect
        case _viewMouseDown    : fn DoMouse( tag )
        case _viewMouseDragged : fn DoMouse( tag )
      end select
  end select

  select ( ev )
    case _windowWillClose : end
  end select
end fn

fn BuildWindow

on dialog fn DoDialog

HandleEvents- Output:

Go
package main

import (
    "fmt"
    "github.com/go-vgo/robotgo"
)

func main() {
    // get position of mouse cursor
    x, y := robotgo.GetMousePos()

    // get color of pixel at that position
    color := robotgo.GetPixelColor(x, y)
    fmt.Printf("Color of pixel at (%d, %d) is 0x%s\n", x, y, color)
}
- Output:
Sample output:
Color of pixel at (659, 253) is 0x300a24
Groovy
import java.awt.Robot

class GetPixelColor {
    static void main(args) {
        println getColorAt(args[0] as Integer, args[1] as Integer)
    }

    static getColorAt(x, y) {
        new Robot().getPixelColor(x, y)
    }
}
Icon and Unicon
Icon and Unicon don't have direct access to the screen; however, we can read the colour of of a maximal sized window instead. The graphics procedure generates all pixels from a rectangular selection as a comma separated string with RGB values.
graphics.icn provides graphics printf.icn provides printf
Sample Output:
x=943,y=946 pixel=0,0,65535
x=658,y=610 pixel=47802,0,65535
x=934,y=487 pixel=0,0,0
J
Note that the concept of "screen" has both hardware and operating system dependencies.
Assuming the OS is Windows (Windows being an operating system with fairly wide adoption, which also guarantees a specific concept of "screen"):
GetDC=:        'user32.dll GetDC >i i'&cd NB. hdx: GetDC hwnd
GetPixel=:     'gdi32.dll  GetPixel >l i i i'&cd NB. rgb: GetPixel hdc x y
GetCursorPos=: 'user32.dll GetCursorPos i *i'&cd NB. success: point
Task example -- reading the color of the pixel at the mouse cursor:
   |.(3#256) #: GetPixel (GetDC<0),1{::GetCursorPos<0 0
121 91 213
Breaking this down:
   GetDC<0
1325469620
   GetCursorPos<0 0
┌─┬───────┐
│1│101 255│
└─┴───────┘
   1{::GetCursorPos<0 0
101 255
   GetPixel 1325469620 101 255
13982585
   |.(3#256)#:13982585
121 91 213
(The windows color result is packed as 0x00bbggrr. So, after splitting the integer result into bytes we need to reverse their order to get red,green,blue.)
Java
public static Color getColorAt(int x, int y){
   return new Robot().getPixelColor(x, y);
}
Julia
# Windows GDI version
function getpixelcolors(x, y)
    hdc = ccall((:GetDC, "user32.dll"), UInt32, (UInt32,), 0)
    pxl = ccall((:GetPixel, "gdi32.dll"), UInt32, (UInt32, Cint, Cint), hdc, Cint(x), Cint(y))
    return pxl & 0xff, (pxl >> 8) & 0xff, (pxl >> 16) & 0xff
end

const x = 120
const y = 100
cols = getpixelcolors(x, y)
println("At screen point (x=$x, y=$y) the color RGB components are red: $(cols[1]), green: $(cols[2]), and blue: $(cols[3])")
- Output:
At screen point (x=120, y=100) the color RGB components are red: 1, green: 36, and blue: 86
Kotlin
import java.awt.*

fun getMouseColor(): Color {
    val location = MouseInfo.getPointerInfo().location
    return getColorAt(location.x, location.y)
}

fun getColorAt(x: Int, y: Int): Color {
    return Robot().getPixelColor(x, y)
}
Lingo
on getScreenPixelColor (x, y)
  sx = xtra("ScrnXtra3").new()
  img = sx.ScreenToImage(rect(x, y, x+1, y+1))
  return img.getPixel(0, 0)
end
Logo
CLEARSCREEN
SHOW PIXEL
[255 255 255]
M2000 Interpreter
Colors is M2000 have a negative value for RGB, or positive for default colors (0 to 15 are the default colors). Also numbers above 0x80000000 (is a positive number), are Windows colors too. Point return a negative value so we have to make it positive to get the RGB value where Red is the least significant byte. Html color has R as the most significant byte (of three), so to display properly we have to use a mix of Right$(),Mid$() and Left$() functions on string representation on color$.
Module CheckColor {
      \\ Print hex code for color, and html code for color
      Every 25 {
            move mouse.x, mouse.y
            color$=Hex$(-point, 3)  ' point has a negative value
            Print Over "0x"+color$+",  #"+Right$(color$,2)+Mid$(color$, 3,2)+Left$(color$,2)
            if mouse<>0 then exit
      }
      Print
}
CheckColor
Mathematica /Wolfram Language
getPixel[{x_?NumberQ, y_?NumberQ}, screenNumber_Integer: 1] := ImageValue[CurrentScreenImage[n], {x, y}]
Nim
Using GTK2
import gtk2, gdk2, gdk2pixbuf

type Color = tuple[r, g, b: byte]

gtk2.nim_init()

proc getPixelColor(x, y: int32): Color =
  var p = pixbufNew(COLORSPACE_RGB, false, 8, 1, 1)
  discard p.getFromDrawable(getDefaultRootWindow().Drawable,
    getDefaultScreen().getSystemColormap(), x, y, 0, 0, 1, 1)
  result = cast[ptr Color](p.getPixels)[]

echo getPixelColor(0, 0)
Using GTK3
import gintro/[gtk, gobject, gio, gdk, gdkpixbuf]

type Color = tuple[r, g, b: byte]

proc getPixelColor(x, y: int32): Color =
  var pixbuf = pixbufGetFromWindow(getDefaultRootWindow(), x, y, 1, 1)
  result = cast[ptr Color](pixbuf.readPixels())[]

proc activate(app: Application) =
  ## Needed by GTK3.
  discard

let app = newApplication("org.gtk.example")
connect(app, "activate", activate)
discard run(app)

echo getPixelColor(1500, 800)
Perl
This example works with MacOS, customize with the appropriate screencapture utility for other OSes.
use strict;
use warnings;
use GD;

my $file = '/tmp/one-pixel-screen-capture.png';

system "screencapture -R 123,456,1,1 $file";

my $image = GD::Image->newFromPng($file);
my $index = $image->getPixel(0,0);
my($red,$green,$blue) = $image->rgb($index);
print "RGB: $red, $green, $blue\n";

unlink $file;
- Output:
RGB: 20, 2, 124
Phix
integer {r,g,b} = im_pixel(image, x, y)
An example of this in use can be found in demo/pGUI/simple_paint.exw
PHP
$img = imagegrabscreen();
$color = imagecolorat($im, 10, 50);
imagedestroy($im);
PicoLisp
Using 'grabc' as recommended in the C solution
(in '(grabc)
   (mapcar hex (cdr (line NIL 1 2 2 2))) )
Output:
73,61,205
-> (73 61 205)
Processing
Access any pixel value on the sketch canvas. A color in Processing is a 32-bit int, organized in four components, alpha red green blue, as AAAAAAAARRRRRRRRGGGGGGGGBBBBBBBB. Each component is 8 bits (a number between 0 and 255), and can be accessed with alpha(), red(), green(), blue().
void draw(){
  color c = get(mouseX,mouseY);
  println(c, red(c), green(c), blue(c));
}
For greater speed, pixels may be looked up by index in the pixels[] array, and color components may be retrieved by bit-shifting.
void draw(){
  loadPixels();
  color c = pixels[mouseY * width + mouseX];
  println(c, c >> 16 & 0xFF, c >> 8 & 0xFF, c >> 8 & 0xFF);
}
Python
def get_pixel_colour(i_x, i_y):
	import win32gui
	i_desktop_window_id = win32gui.GetDesktopWindow()
	i_desktop_window_dc = win32gui.GetWindowDC(i_desktop_window_id)
	long_colour = win32gui.GetPixel(i_desktop_window_dc, i_x, i_y)
	i_colour = int(long_colour)
	win32gui.ReleaseDC(i_desktop_window_id,i_desktop_window_dc)
	return (i_colour & 0xff), ((i_colour >> 8) & 0xff), ((i_colour >> 16) & 0xff)

print (get_pixel_colour(0, 0))
def get_pixel_colour(i_x, i_y):
	import PIL.ImageGrab
	return PIL.ImageGrab.grab().load()[i_x, i_y]

print (get_pixel_colour(0, 0))
def get_pixel_colour(i_x, i_y):
	import PIL.Image # python-imaging
	import PIL.ImageStat # python-imaging
	import Xlib.display # python-xlib
	o_x_root = Xlib.display.Display().screen().root
	o_x_image = o_x_root.get_image(i_x, i_y, 1, 1, Xlib.X.ZPixmap, 0xffffffff)
	o_pil_image_rgb = PIL.Image.fromstring("RGB", (1, 1), o_x_image.data, "raw", "BGRX")
	lf_colour = PIL.ImageStat.Stat(o_pil_image_rgb).mean
	return tuple(map(int, lf_colour))

print (get_pixel_colour(0, 0))
def get_pixel_colour(i_x, i_y):
	import gtk # python-gtk2
	o_gdk_pixbuf = gtk.gdk.Pixbuf(gtk.gdk.COLORSPACE_RGB, False, 8, 1, 1)
	o_gdk_pixbuf.get_from_drawable(gtk.gdk.get_default_root_window(), gtk.gdk.colormap_get_system(), i_x, i_y, 0, 0, 1, 1)
	return tuple(o_gdk_pixbuf.get_pixels_array().tolist()[0][0])

print (get_pixel_colour(0, 0))
def get_pixel_colour(i_x, i_y):
	import PyQt4.QtGui # python-qt4
	app = PyQt4.QtGui.QApplication([])
	long_qdesktop_id = PyQt4.QtGui.QApplication.desktop().winId()
	long_colour = PyQt4.QtGui.QPixmap.grabWindow(long_qdesktop_id, i_x, i_y, 1, 1).toImage().pixel(0, 0)
	i_colour = int(long_colour)
	return ((i_colour >> 16) & 0xff), ((i_colour >> 8) & 0xff), (i_colour & 0xff)

print (get_pixel_colour(0, 0))
Racket
See get-pixel-color.rkt.
Raku
(formerly Perl 6)
This example works with MacOS, customize with the appropriate screencapture utility for other OSes.
use GD::Raw;

my $file = '/tmp/one-pixel-screen-capture.png';

qqx/screencapture -R 123,456,1,1 $file/;

my $fh    = fopen($file, "rb") or die;
my $image = gdImageCreateFromPng($fh);
my $pixel = gdImageGetPixel($image, 0, 0);
my ($red,$green,$blue) =
    gdImageRed(  $image, $pixel),
    gdImageGreen($image, $pixel),
    gdImageBlue( $image, $pixel);

say "RGB: $red, $green, $blue";

fclose($fh);
unlink $file;
- Output:
RGB: 20, 2, 124
Alternately, a version that should work in any X11 environment. Needs X11::xdo and MagickWand installed.
signal(SIGINT).tap: { sleep .1; cleanup(); print "\n" xx 50, "\e[H\e[J"; exit(0) }

multi MAIN () {
    use X11::libxdo;
    my $xdo = Xdo.new;
    my ($lx, $ly) = 0, 0;
    loop {
        sleep .1;
        my ($x, $y, $) = $xdo.get-mouse-location;
        next if $lx == $x and $ly == $y;
        ($lx, $ly) = $x, $y;
        display $x, $y, |get-pixel($x, $y);
    }
}

my %*SUB-MAIN-OPTS = :named-anywhere;

multi MAIN (
    Int $x,    #= Integer x coordinate to pick
    Int $y,    #= Integer y coordinate to pick
    $q = False #= Boolean "quiet" mode, set truthy for decimal values, set to h for hex values
  ) {
    my ($red, $green, $blue) = get-pixel($x, $y);

    if $q {
        $q.lc eq 'h' ??
          ( printf "%02X:%02X:%02X\n", $red, $green, $blue ) !!
          ( printf "%03d:%03d:%03d\n", $red, $green, $blue );
    } else {
        display($x, $y, $red, $green, $blue);
        cleanup();
    }
    exit(0);
}

sub get-pixel ($x, $y) {
    my $xcolor =
      qqx/import -window root -crop 1x1+{$x-1 max 0}+{$y-2 max 0} -depth 8 txt:-/
      .comb(/<?after '#'><xdigit> ** 6/);

    |$xcolor.comb(2)».parse-base(16);
}

sub display ($x, $y, $r, $g, $b) {
    print "\e[?25l\e[48;2;0;0;0m\e[38;2;255;255;255m\e[H\e[J";
    printf "  x: %4d y: $y\n", $x;
    printf "  RGB: %03d:%03d:%03d \n  HEX: %02X:%02X:%02X\n",
            $r, $g, $b, $r, $g, $b;
    print "\e[38;2;{$r};{$g};{$b}m ",
           ('█' x 18 xx 6).join("\n "), "\n\n";
}

sub cleanup { print "\e[0m\e[?25h" }
REXX
This program only works
- Personal REXX or
- PC/REXX
This REXX version uses the position of the cursor.
The REXX program converts the hexadecimal attribute of the character at the location of the cursor to a familiar name of a color.
/*REXX program obtains the cursor position (within it's window) and displays it's color.*/
parse value  cursor()  with  r  c  .             /*get cursor's location in DOS screen. */

hue=scrRead(r, c, 1, 'A')                        /*get color of the cursor's location.  */
if hue=='00'x  then color= 'black'               /*or dark grey, dark gray.             */
if hue=='01'x  then color= 'darkblue'
if hue=='02'x  then color= 'darkgreen'
if hue=='03'x  then color= 'darkturquoise'       /*or dark cyan.                        */
if hue=='04'x  then color= 'darkred'             /*or maroon.                           */
if hue=='05'x  then color= 'darkmagenta'         /*or dark pink.                        */
if hue=='06'x  then color= 'orange'              /*or dark yellow, orage, brown.        */
if hue=='07'x  then color= 'gray'                /*or grey, gray, dark white.           */
if hue=='08'x  then color= 'gray'                /*or grey, gray, dark white.           */
if hue=='09'x  then color= 'blue'                /*or bright blue.                      */
if hue=='0A'x  then color= 'green'               /*or bright green.                     */
if hue=='0B'x  then color= 'turquoise'           /*or bright turquoise, cyan, britecyan.*/
if hue=='0C'x  then color= 'red'                 /*or bright red.                       */
if hue=='0D'x  then color= 'magenta'             /*or bright magenta, pink, brite pink. */
if hue=='0E'x  then color= 'yellow'              /*or bright yellow.                    */
if hue=='0F'x  then color= 'white'               /*or bright, brite white.              */
say 'screen location ('r","c') color is:' color  /*display color of char at row, column.*/
- output:
screen location (33,1) color is: yellow
Ring
# Project : Color of a screen pixel

Load "gamelib.ring"
r = 0
g = 0
b = 0
al_init()
al_init_image_addon()
display = al_create_display(1000,800)
al_set_target_bitmap(al_get_backbuffer(display))
al_clear_to_color(al_map_rgb(255,255,255))
image = al_load_bitmap("stock.jpg")
al_draw_rotated_bitmap(image,0,0,250,250,150,0)
al_draw_scaled_bitmap(image,0,0,250,250,20,20,400,400,0)
ring_getpixel(image,300,300)
see "r = " + r + nl
see "g = " + g + nl
see "b = " + b + nl
al_flip_display()
al_rest(2)
al_destroy_bitmap(image)
al_destroy_display(display)

func ring_getpixel(image,x,y)
       newcolor = al_get_pixel(image,x,y)
       r=copy(" ",4)  g=copy(" ",4)  b=copy(" ",4)
       p1 = VarPtr("r","float")
       p2 = VarPtr("g","float")
       p3 = VarPtr("b","float")
       al_unmap_rgb_f(newcolor, p1 , p2 , p3 )
       r = bytes2float(r)
       g = bytes2float(g)
       b = bytes2float(b)
       return [r,g,b]
Output:
r = 0.42
g = 0.29
b = 0.27
RPL
RPL was designed for black-and-white LCD screens. The PIX? instruction returns 1 if the designated pixel is black - actually dark gray or blue, depending on the model - and 0 if it's not.
(10,10) PIX?
PIX? was introduced in 1990 with the HP-48. On previous machines (HP-28C/S), the only way to test a pixel was to convert the status of the 131x32 LCD matrix into a 548-character string using the LCD→ command, and then test the appropriate bit of the appropriate character.
Ruby
This example requires ImageMagick >= 6.2.10 (works on X11, unsure about other platforms).
module Screen
  IMPORT_COMMAND = '/usr/bin/import'

  # Returns an array with RGB values for the pixel at the given coords
  def self.pixel(x, y)
    if m = `#{IMPORT_COMMAND} -silent -window root -crop 1x1+#{x.to_i}+#{y.to_i} -depth 8 txt:-`.match(/\((\d+),(\d+),(\d+)\)/)
      m[1..3].map(&:to_i)
    else
      false
    end
  end
end
Scala
def getColorAt(x: Int, y: Int): Color = new Robot().getPixelColor(x, y)
Smalltalk
Display rootView colorAt:(10@10).
Display rootView colorAt:(Display pointerPosition)
Standard ML
Works with PolyML
open XWindows ;
val disp =  XOpenDisplay "" ;

val im =
let
   val pos =  #4 (XQueryPointer (RootWindow disp)) ;
in
   XGetImage (RootWindow disp) (MakeRect pos (AddPoint(pos,XPoint{x=1,y=1})) ) AllPlanes ZPixmap
end;

 XGetPixel disp im (XPoint {x=0,y=0}) ;
result
val it = 6371827: int
Tcl
Works only on X11 or OSX with Xquartz.
package require Tcl 8.5
package require Tk

# Farm out grabbing the screen to an external program.
# If it was just for a Tk window, we'd use the tkimg library instead
proc grabScreen {image} {
    set pipe [open {|xwd -root -silent | convert xwd:- ppm:-} rb]
    $image put [read $pipe]
    close $pipe
}
# Get the RGB data for a particular pixel (global coords)
proc getPixelAtPoint {x y} {
    set buffer [image create photo]
    grabScreen $buffer
    set data [$image get $x $y]
    image delete $buffer
    return $data
}

# Demo...
puts [format "pixel at mouse: (%d,%d,%d)" \
    {*}[getPixelAtPoint {*}[winfo pointerxy .]]]
Wren
import "dome" for Window, Process
import "graphics" for Canvas, Color
import "input" for Mouse

class Game {
    static init() {
        Window.title = "Color of a screen pixel"
        Canvas.cls(Color.orange) // {255, 163, 0} in the default palette
    }

    static update() {
        // report location and color of pixel at mouse cursor
        // when the left button is first pressed
        if (Mouse.isButtonPressed("left")) {
            var x = Mouse.x
            var y = Mouse.y
            var col = Canvas.pget(x, y)
            System.print("The color of the pixel at (%(x), %(y)) is %(getRGB(col))")
            Process.exit(0)
        }
    }

    static draw(dt) {}

    static getRGB(col) { "{%(col.r), %(col.g), %(col.b)}" }
}
- Output:
Sample output:
$ ./dome color_of_screen_pixel.wren
The color of the pixel at (152, 115) is {255, 163, 0}
XPL0
Color gets either 1, 2, 4, 8, 15, 16, or 24 significant bits depending on the current graphic mode enabled on an IBM-PC compatible machine with VESA graphics.
code ReadPix=44;
int  Color, X, Y;
Color:= ReadPix(X, Y);- Programming Tasks
- GUI
- Testing
- 6502 Assembly
- 8086 Assembly
- Action!
- App Inventor
- AutoHotkey
- AutoIt
- Axe
- BaCon
- BASIC
- AmigaBASIC
- Applesoft BASIC
- BBC BASIC
- Commodore BASIC
- FreeBASIC
- QuickBASIC
- Integer BASIC
- Liberty BASIC
- Locomotive Basic
- PureBasic
- QBasic
- BASIC256
- SmileBASIC
- TI-89 BASIC
- Visual Basic .NET
- VBA
- Yabasic
- ZX Spectrum Basic
- C
- Xlib
- C sharp
- C++/CLI
- Clojure
- Common Lisp
- Delphi
- F Sharp
- FutureBasic
- Go
- RobotGo
- Groovy
- Icon
- Unicon
- Icon Programming Library
- J
- Java
- Robot
- Julia
- Kotlin
- Lingo
- ScrnXtra3 Xtra
- Logo
- M2000 Interpreter
- Mathematica
- Wolfram Language
- Nim
- GTK2
- Gintro
- Perl
- Phix
- Phix/pGUI
- PHP
- GD
- PicoLisp
- Processing
- Python
- PyWin32
- PIL
- Python-xlib
- PyGTK
- PyQt
- Racket
- Raku
- REXX
- Ring
- RPL
- Ruby
- Scala
- Smalltalk
- Standard ML
- Tcl
- Tk
- Wren
- DOME
- XPL0
- ACL2/Omit
- AWK/Omit
- Batch File/Omit
- Blast/Omit
- Brainf***/Omit
- EasyLang/Omit
- GUISS/Omit
- Lilypond/Omit
- Logtalk/Omit
- Lotus 123 Macro Scripting/Omit
- Maxima/Omit
- MUMPS/Omit
- PARI/GP/Omit
- PostScript/Omit
- R/Omit
- Stata/Omit
- TPP/Omit
- UNIX Shell/Omit